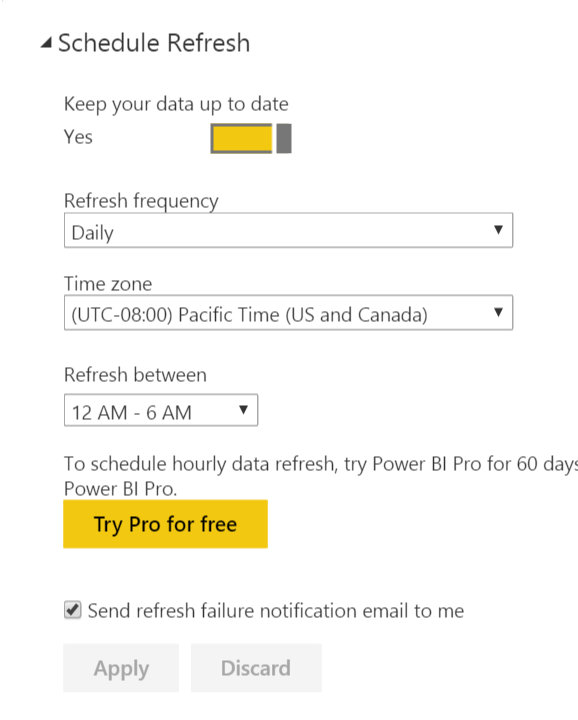
Careful! Don’t click “Try Power BI for free”

This was a weird quirk.

I have Power BI Free account and uploaded a report to Power BI Service. The report has dataset that gets data from a Sharepoint file.

In Power BI Service I went to the dataset “Schedule Refresh”, selected “Connect Directly”, “Enter Credentials” as oAuth, then entered my Office 365 credentials. This setup the connection successfully to the Sharepoint file, and then I could switch the “Keep your data up to date” to “Yes”.

Then I accidentally clicked the “Try Pro for Free” button.

From that point on, every time I selected the Power BI Service dataset or the report, I got a pop up blocking message “To see this report upgrade to power bi pro”.

pro upgrade

The only way to make it stop was to switch the “Keep your data up to date” to “No”.

The only Pro feature is hourly updates. The Free Power BI Service version only allows daily updates. I hadn’t selected hourly updates so that wasn’t the problem. Just some weird quirk.

The resolution was to delete the report and dataset that I just scheduled refresh for, and then upload the report again and then redo the schedule refresh as per above (without accidentally clicking on the Try Pro for free button) to make it work again.

How to schedule Power BI dataset refresh

Do you want to create a Power BI Report that gets a daily scheduled refresh of data from a Sharepoint csv file?

The first step is to create your Power BI report in Power BI Desktop using the Sharepoint csv file as data source.

In Power BI Desktop use Get Data – File – Sharepoint Folder to connect to your Sharepoint Folder.

The resulting dataset query (Power Query) will look something like mine below. You will replace “mydomain” with your Sharepoint account name or domain.

You will also replace “datafile.csv” with your csv file name. The Power BI connection is to a Sharepoint folder which might have more than one file like I did. If you have only one file in the folder the filter will be redundant but can’t hurt.

let
Source = SharePoint.Files("https://mydomain.sharepoint.com", [ApiVersion = 15]),
#"Filtered Rows" = Table.SelectRows(Source, each ([Name] = "datafile.csv")),
#"Combined Binaries" = Binary.Combine(#"Filtered Rows"[Content]),
#"Imported CSV" = Csv.Document(#"Combined Binaries",[Delimiter=",", Columns=11, Encoding=1252, QuoteStyle=QuoteStyle.None]),
#"Promoted Headers" = Table.PromoteHeaders(#"Imported CSV")
in
#"Promoted Headers"

After you publish your report to your Power BI Online account you can select your newly uploaded dataset’s “Schedule Refresh” property where you can set up the refresh schedule.

schedule_refresh


First go to “Gateway connection”.

I selected “Connect Directly” which requires that you also enter Sharepoint credentials in the “Edit credentials” link which pops up a web page that prompts you to login into your Sharepoint account. This gives Power BI Service permission to access your Sharepoint account to refresh file.

If you have an enterprise gateway setup you could try “Enterprise Gateway” and enter the required credentials for that.


gateway_connection


If you entered credentials correctly you should now be able to select the “Keep your data up to date” switch to “Yes”.

Then you can select which four 6-hour window you want refresh to run. Power BI Service free accounts can do daily refreshes. Pro accounts can have hourly updates.

As an aside be warned that if you click the “Try Pro for free” button you might get a blocking message that you are using Pro feature. This happened to me and was clearly a quirky error. I had to delete my report and dataset and re-upload them and redo the scheduling to get rid of the error.

schedule_refresh_option


You can try refreshing the dataset manually (On demand) or wait for the next scheduled refresh (Scheduled) to happen to see if the data does refresh. You can see refreshes are successful and when they ran by clicking the “refresh history ” link.

refresh_history


Power BI Online – get data from Office 365 Sharepoint file

I want to create a Power BI Online report with a data source from a file on a remote web server that updates automatically so my Power BI report is always up to date.

Power BI Desktop and Online have lots of data connectors to third party ‘Online Services’ eg Salesforce, Mailchimp, Github, etc, as well as file and database connectors. But none of these help to get the file from my remote server directly.

There is no feature to connect to a file on a remote server. I could put my remote file data into MySQL or Postgres database and Power BI could connect to those but my remote server doesn’t allow external connections to hosted databases. So that is not an option for me.

A Power BI Online report can get data from a Sharepoint site file that will update automatically on schedule.

Since I have an Office 365 E3 account which has Sharepoint site I upload my remote file to the Sharepoint site and create a Power BI Online report linked to that Sharepoint file.

I would still have to figure out how to automate uploading my remote server file to my Office 365 E3 account Sharepoint site. But I am pretty sure I can do that with the OneDrive API but more on that in Part 2.

Here is a diagram outlining what I think my solution could be.

powerbidatapath

In the meantime to test using Office 365 Sharepoint file as data source for a Power BI Online report, I created a Power BI report in Desktop with file data source from my Office 365 Sharepoint site and Published it to my Power BI Online account.

After publishing the report to my Power BI Online account, I logged into Power BI Online, opened the newly published report and went to data source options and selected ‘Schedule Refresh’ which produced screen below.

onedriverefresh

I set ‘Keep your data up to date’ to ‘Yes’ and selected ‘Connect Directly’ which gave me error message telling me I had to update credentials.

Not surprisingly the report I published to Power BI Online didn’t ‘remember’ that I had already authorized the Power BI Desktop report to get file from my Office 365 Sharepoint site so I have to do it again in Power BI Online.

So I selected ‘Edit Credentials’ and then selected ‘oAuth’ as type of credentials which popped up Office 365 login screen where I entered my user and password clicked login and was returned back to Power BI online page.

The error message was gone so this must have created oAuth authentication to link the file data source from my Office 365 Sharepoint site into the data source in Power BI Online.

Then I set the automatic refresh to one of the daily 6-hour windows (below i have selected 12 pm to 6 pm) for refresh to run (hourly refresh is a Power BI Pro feature).

The report data source now refreshes from my Sharepoint file on daily automatic schedule so it looks like I am half way to my solution.

I will write another blog post detailing how I will automate moving my data file from my remote server to my Office 365 Sharepoint site. Pretty sure I will be using the OneDrive API https://dev.onedrive.com but there are other options too.

In the meantime talk a look at the previous blog post summarizing the OneDrive and Sharepoint API options.

One challenge I have encountered so far is that the OneDrive Python SDK is made for web apps and I want to setup server app (native client app).  More to come.

OneDrive API features

Microsoft has three file storage options:

    1. OneDrive Personal
    2. OneDrive Business
    3. Sharepoint

These have recently been unified into one new OneDrive API https://dev.onedrive.com and oAuth is preferred method of authentication.

However there are some key differences how the API:

    • OneDrive Personal authenticates against oAuth account created at Microsoft Application Registration Portal using a Microsoft account (Live, Microsoft.com). Authentication url is: https://login.live.com/oauth20_authorize.srf
    • OneDrive Business and Sharepoint authenticate against oAuth account created in Azure Active Directory and must be done with Office 365 account.  Authentication url is: https://login.microsoftonline.com/common/oauth2/

You can create two types of applications that will have different methods and parameters:

    • Web application – web site based application that user can sign into. Require definition of an active redirect url and definition of client secret. Scopes or permissions are identified on the fly when authentication is made.
    • Native client application – Android, ‘head-less’ server app, etc. Requires only definition of an unique redirect uri and scopes or permissions that Office 365 account / user have available eg read & write files, etc.

The process for authentication is similar:

    • Sign-in with user account/password or send authentication url to authentication server to get authentication code.
    • Server sends back url with authentication code.
    • Retrieve authentication code from url.
    • Send another url comprised of code and other parameters back to server to get tokens.
    • Use tokens to list, view, upload, download files etc.

There are development SDKs available for popular languages.

I was only interested in thePython SDK . Some key notes about it include:

    • It is created specifically for web applications, not native client applications. The SDK authentication method relies on using a web browser to pass urls with parameters, codes and tokens back and forth. A native client application will not use web browser. A work around was to use head-less browser but that is a bit hacky.
    • It only has OneDrive Personal authentication urls. To use this with OneDrive Business or Sharepoint these urls are easily replaced with the OneDrive Business authentication urls in two files: auth_provider.py and the onedrivesdk_helper.py.

The change to the unified OneDrive API and oAuth authentication only happened in late 2015 so this is pretty new.

There weren’t many well developed or well documented OneDrive Python example code available.

Note it is still also possible to work with OneDrive Business, Sharepoint and OneDrive Personal without using oAuth authentication and this new OneDrive API by simply using urllib, request and templating along with hard coded Office 365 username and password in your code to authenticate.

Finally Microsoft Graph API can be used to interact with OneDrive Business, Sharepoint and OneDrive Personal  once oAuth is setup.


BC Hydro’s amazing #BCStorm social media turnaround

BC Hydro made an amazing social media turnaround to communicate with customers in crisis! Go BC Hydro!

On August 29, 2015 high winds caused tree falls that took out BC Hydro power lines throughout BC’s Lower Mainland, Vancouver Island, Sunshine Coast leaving up to 500,000 customers without electricity. Many including me were without power for 48 hours.

BC Hydro’s web site was their primary channel for communicating with customers about extent of damage and expected time for repairs, but the site also went down during this time. H

They had used Twitter in the past to communicate with customers but they weren’t using it much on first day of crisis.

However on the second day of the crisis with 100,000+ customers still without power BC Hydro dramatically increased Twitter communication by responding directly to customer tweets about extent of damage and expected time for repairs.

To visualize this dramatic increase in BC Hydro Twitter usage I downloaded all @BCHydro tweets for August 29 and 30 from Twitter’s API using Python Tweepy and used Microsoft Power BI to create a visualization of BC Hydro tweet counts which is shown below.

Some notes on chart:

    • x axis shows date and hour of day
    • y-axis shows count of tweets
    • ‘response’ tweets are light green part of bar
    • ‘status’  tweets are dark green part of bar

You can see that on August 30 at 11 AM, about 28 hours after the storm hit, BC Hydro suddenly starts tweeting responses to customers’ questions. They continued for the next few days until their website was back up in addition to their regular ‘status’ tweets.

The chart clearly shows a very amazing social media turnaround! BC Hydro dramatically increased their use of Twitter to get customers answers and information. Go BC Hydro!

Note: the Twitter data was last updated Aug 31, 2015 at 16.45 PM PST.

bchtweets


Historically BC Hydro did not use Twitter this way.  The chart below shows BC Hydro’s tweeting before the storm. They were tweeting once or twice per day with occasional spikes to 7 tweets per day.


bchtweets_before


The ‘response‘ category includes tweets by BC Hydro responding to a customer tweet. Example ‘response’ tweet:

2015-08-30 14:26:01, @Adamhillz Crews will be on site as soon as possible. Stay back from any downed lines and call 911 if it is on fire.

The ‘status‘ category includes tweets by BC Hydro about ongoing status of repair work etc. Example ‘status’ tweet:

2015-08-30 14:28:32, Crews have been brought in from across province, including Prince George, Terrace, Kamloops, Smithers, Vernon & Vancouver Island #bcstorm

FYI if anyone is interested, here is the text file with tweet text – bchtweets

Here is the Python code used to get the BC Hydro Tweets using the Twitter API.

import tweepy
#import MySQLdb
from datetime import datetime
import random
import sys, os
import json
from dateutil import tz
from tweet_auth import * #this is another .py file with the twitter api credentials

#get twitter auth
auth = tweepy.OAuthHandler(consumer_key, consumer_secret)
auth.set_access_token(access_token, access_token_secret)
api = tweepy.API(auth)

def main():
with open('bchtweets.csv', 'wb') as file:
for status in tweepy.Cursor(api.user_timeline, id='bchydro').items(1800):
file.write(str(status.created_at.replace(tzinfo=tz.gettz('UTC')).astimezone(tz.gettz('America/Los_Angeles')).replace(tzinfo=None)) + ', ' + status.text.encode('utf8') + '\n')

if __name__ == '__main__':
main()

Note that there is a separate file with my Twitter OAuth credentials that looks like the following. You just have to replace the ‘xxx…’ with your credentials.

#twitter api oauth credentials - replace with yours
consumer_key = 'xxxxxxxxxxxxxxxxxxxxxxxxxxxxxxxxxxxx'
consumer_secret = 'xxxxxxxxxxxxxxxxxxxxxxxxxxxxxxxxxx'
access_token = 'xxxxxxxxxxxxx-xxxxxxxxxxxxxxxxxxxxxxxxxxxxxxxxx'
access_token_secret = 'xxxxxxxxxxxxxxxxxxxxxxxxxxxxxxxxxxxxxxxxxx'